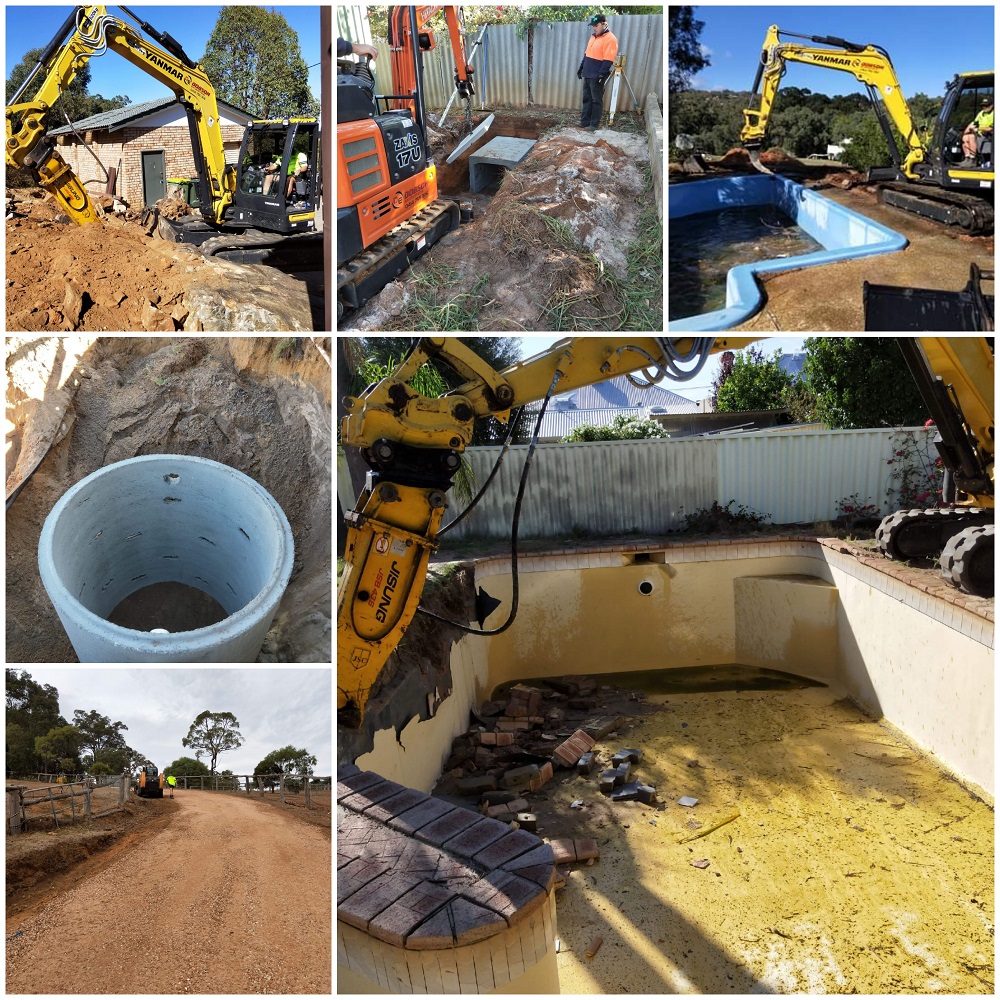
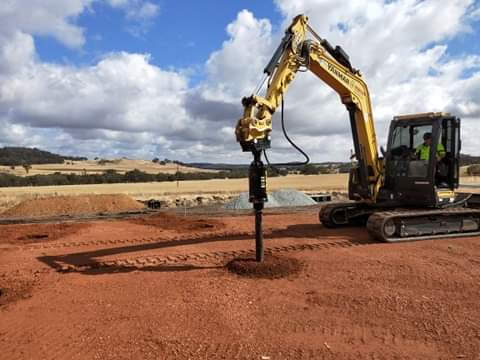
House pad preparation

What happens during house pad preparation? Prior to pouring the foundation or doing anything else involving the actual construction of the house, the house pad must be prepared.  Starting the construction of any building before preparing the house pad properly is setting yourself up for disaster.  It’s an essential part of the process and there’s no way to avoid it without being willing to accept disastrous consequences down the road.

The Soil Where a Building Is Being Constructed Is Usually Not Suitable for Building

Soil is rarely naturally in the proper condition to be built on.  Soil contains impurities that can be problematic.  If there is too much organic matter in the soil it will sink and compact too much.  If there are large rocks or boulders, they will shift and move, which can cause the soil to collapse beneath the foundation.  There could be other issues as well, any type of debris that is in the soil before construction and pouring the foundation needs to be removed.  If there are any trees, existing structures, or vegetation, these will all have to be removed.

After the area has been cleared of impurities, vegetation, structures, and anything else the sand can be added to the construction site.  Sand helps to raise the ground level up before the excavation process, which will aid with drainage and water control once the building has been constructed.  The sand will then have to be compacted thoroughly to make sure that it is stable, a compaction test is also required to certified the pad before building begins so the weight of a foundation and building can now be placed on it.  Once all of this has been done, then the initial stages of construction can begin.

Will this take time? Yes.  Is it an added expense? Yes.  Is it necessary? Yes.  If you don’t test the sand and ensure that it is stable enough for building, you run the very real risk of constructing a building that will not be structurally sound.

Excavation

Excavation is another step in the process of preparing a house pad for construction.  During this step a trench will be dug, and then the sand will be compacted to allow for the foundation to be poured.  After the trench is dug and the foundation has been put in, then backfilling the area will be necessary to reinforce the foundation and prepare for the construction of any structures.

Once all these steps have been completed grading will be necessary to ensure you have a nice, even surface to build on.  While this might seem like a lot just to get to the point where you are ready to start construction, these are all important steps that cannot be skipped over. Dobson Excavations takes all uncertainties out of your house pad preparation. Our experienced and professional team makes sure that the foundation of your house is properly constructed.…

What if rocks are found during excavation?

While this can be problematic, when you have a contractor that is experienced, they should be able to come up with a plan on how to deal with this issue.  Running into rocks during an excavation could present anything from a minor challenge to a major one, depending on how much rock is present.  If it’s a significant amount of rock that cannot be easily removed, then it will have to be broken down first.  This is where the rock hammer attachment comes into place.

Having a Plan in Place Ahead of Time Makes the Process Easier

Many construction sites have rock hidden below the surface, the key to being able to deal with this is to have the rock hammer attachment on hand.  Everything underground is unknow, we will not know if rock is present until we start digging, there are times depending on what area you live in, that we may be able to determine if rock is present or not, While we’re usually fairly accurate when determining the presence of rock depending on the area you live in, under the ground in all area is unknown.

If Rock’s are present that a regular excavator cannot deal with, we have 2 rock hammer attachment to break the rocks for 2 of our excavators. The 2ton Excavator and the 8ton Excavator, so whether the job is a small one or a larger job we can assist with all rock breaking. Our 21 ton Excavator can be equipped with a rock hammer attachment as well.…

Backfilling trenches and foundations

Understanding the steps to backfilling trenches and foundations will give you the knowledge you need to ensure the contractor you hired is providing you with quality work and service.  What is backfilling? Backfilling is the process of replacing lost material around a foundation after excavation.  Before a foundation can be poured a trench or pit will have to be dug to allow room for the foundation to be placed.  Once it has been placed, you’ll need to backfill the area surrounding the foundation to help provide it with support.  Concrete is strong and durable, but only when properly supported.  If it isn’t supported then it will crack, or even break, which can cause major structural damage to a building.  While backfilling might sound simple enough, if it isn’t done properly it can end up causing damage to a building’s foundation, which can be a very expensive problem to repair.

Choose The Right Backfill Material

The easiest option when backfilling around a foundation is to use the original soil that was excavated to create space for the foundation to be installed.  But just because something is the easiest solution does not mean that it is the best solution.  If you use soil that has too much organic matter in it, it’s going to compact more than regular soil.  This can cause sinking, which can cause structural damage.  If you use soil that has large boulders in it to backfill, these boulders will shift and move, which will cause the soil to sink, which can also lead to structural damage.  It’s important to choose coarse grained soil for backfilling.  Is this possibly another expense? Yes, but in this case, it’s worth it to avoid the headaches that can result if the backfilling process isn’t done correctly.

Reinforce the Strongest Parts of The Foundation First

Sometimes when a construction or work crew is under a tight deadline there may be a temptation to try to rush things to get them done quickly.  Backfilling around a foundation may appear to be a simple process, and there may be a thought of just working quickly to get it completed.  But this would be a mistake.  Backfilling should be started at the strongest point of a foundation, then slowly built up around the perimeter of the foundation.  Placing too much soil around any one area of the foundation at once will put stress on it, which can easily lead to a collapse.

After about six to eight inches of soil have been placed it should be wet and compacted before moving on.  While using wet backfill material is a problem, that’s a different situation than wetting the material evenly once it has been placed.  After you have built up each layer of soil until the entire foundation is surrounded you will have completed backfilling around the foundation.…

Causes and solutions to soil loss

The causes and solutions to soil loss can be a complicated subject that requires the guidance of a professional to fully understand and deal with the issue.  Soil erosion is more than just a problem for farmers, it’s something that can affect every property owner.  Soil erosion can damage your property’s foundation. That’s right, soil erosion can damage the foundation of a building, which can destabilize it and cause major structural issues.  That’s why it’s important to understand what soil erosion is, and more importantly what you can do to prevent it.

What causes soil erosion? The main culprit is water.  While wind and other forces can have a minor effect on soil erosion, for the most part, they aren’t much to be concerned about.  Water on the other hand, is a major concern.  When rain falls and it strikes dirt that does not have any vegetation covering it, the dirt is displaced.  A single drop of rain doesn’t go much, but during heavy rainfall countless drops combine to create a significant effect.

When rain first strikes bare earth it causes soil erosion, but that’s not the end of the process.  During heavy rains not all the rainfall can be absorbed quickly enough by the ground, which results in pooling of water, and frequent runoffs.  As water flows it also moves soil, causing erosion.

What you need to remember about soil erosion is that it’s not something that generally happens overnight.   While torrential rainfall can cause a massive amount of soil erosion quickly, that is the exception and not the norm.  Normally, soil erosion takes place over the course of several years while the accumulated effects of rain slowly shape and alter the landscape.

Soil erosion is a major problem for farmers since it strips away the top layers of soil and can make it much more difficult to sustain crops.  Vital nutrients in the soil can wash away, which makes sustaining crops more difficult.  This, in turn, leads to more bare earth due to less crop growth, which feeds into the cycle causing additional soil erosion.

While this is a problem, it’s likely not one that affects you directly.  Farmers have learned how to deal with it, so how is soil erosion a problem for the average home or business owner? When a building is designed properly the landscape is designed in a way to allow for water from heavy rains to flow away from the building.  When there is significant soil erosion, the designs are compromised, which can lead water to pool around the edges of a building.  When this happens, it can seep into the ground and destabilize the foundation of a building.

What can you do to help prevent soil erosion? Consulting with a professional is your best option since they can provide you with a customized plan based upon the location of your home or business.  They will likely look at your property to ensure that runoffs have been designed, and to also ensure that …

The Brush cutter – A versatile piece of equipment

The brush cutter overcomes various problems making it a fantastic piece of equipment for any landscaping company.  First, what is a brush cutter? A brush cutter is a heavy-duty piece of Earthmoving equipment designed for clearing areas that are overgrown with grass and other types of vegetation.  Unlike a lawnmower, a brush cutter can easily cut through tall grass, small bushes and even small trees, giving a landscaper the ability to quickly clear an area of unwanted vegetation.  If you have an acreage property that has been neglected, a paddock that needs to be cleared, or you need to cut a path through an area with a lot of plant life, then a brush cutter is the ideal tool for the job.

Time is money, most people have heard that phrase, and that’s true with landscaping and excavation work.  Our people, as great as they are, don’t work for free.  That’s why employing the right tool for the right situation is so important.  A brush cutter lets one person do what would normally take a team of several people much more time to complete.  Using a brush cutter lets us get an area cleared quickly, allowing us to keep a project moving along on the planned timeframe.

Brush cutters are very powerful attachments designed to cut through thick brush and vegetation.  They take a lot of abuse and are built with that in mind.  They also require a lot of power to do what they do, and they use a heavy, high-speed blade for cutting through thick underbrush.  What does all this mean? It means that like any other powerful machine, it takes someone with the proper training to operate it safely.  This makes it perfect to make your property firebreak complaint.

If a brush cutter’s blade strikes a branch or tree at the wrong angle it may not be able to cut through it.  All the energy that is being used to cut through something must go somewhere, and that’s usually right back into the handle.  This can be very jarring for anyone not used to operating a brush cutter, which may cause them to lose control over the machine.  Our professionals know what to expect if this happens, and more importantly, they know how to avoid it.  They understand how to operate a brush cutter while avoiding hitting things with the wrong part of the blade.

Brush cutters are powerful machines, but they still require a human component, and they can be very tiring to use, especially if you have a large area to clear.  Accidents and fatigue often go hand in hand, which is why we have our operators work as a team.  By switching off periodically and taking breaks they can keep the process moving along while avoiding fatigue, which reduces the risk of an accident.

We also take excellent care of our brush cutters, just like we do with the rest of our equipment.  Each time, before being used, we thoroughly inspect our brush cutters …

Everything you need to know about Augers

An earthmoving auger attachment is a very specialized piece of equipment that is only ever used for one purpose, drilling holes.  Most other pieces of equipment that we own can be used for multiple purposes, making them efficient.  But there are times when a specialized piece of equipment is needed that only does one specific thing, and in the case of drilling holes, that’s an earth auger.  These precision tools help us to save time, which means that they also help us stick to the timetable that we commit to.

Augers Are Capable of Drilling Deep, Narrow Holes

An auger attachment is very useful in the construction industry because it allows for holes that are narrow and of varying depths to be dug.  Without an extension an auger can usually dig a hole that is anywhere from as shallow as a 200mm, up to as deep as 5 metres.  If you need to go deeper an extension can, be added to tunnel deeper into the ground.  Now that you see what an auger can do, you probably have a better idea of why it is such a valuable piece of equipment and how useful it can be.

When Would an Earth Auger Be Used?

Earthmoving auger attachments are ideal for drilling narrow holes, pier holes, such as for a column, fence post, pipe or footings.  While you can use an excavator or other tools to accomplish the same things, it’s much more difficult, and involves much more work than simply choosing the right tool for the job.

Can a Drill be Used Instead of an Auger?

An auger can drill much deeper than a drill and is far more versatile.  Now, if you only need to drill down a foot or two, then using an auger is overkill.  But, if you need a deep hole that is narrow as well, then an auger is the way to go.


Do we Have Personnel Trained to Use Earth Augers?

One thing that you can count on is that if we have equipment that we use, we have personnel that are highly trained in how to use it.  Our people are experienced in using all of our equipment. They can use it efficiently, and most importantly safely.  While there’s no way to be certain that we’ll need to use an earth auger when working on your property until we do an inspection, if we do, you can trust that the auger will be used by an experienced and qualified professional. Get in touch with us today.…

Bobcat vs excavator: What are the differences?

A bobcat or skid steer as they are known as, Bobcat is actually a brand name, skid steer is what the machines are, they can be hired in different sizes, in many different brand names, they either have tracks or tyres, most popular at present is the tracked skid steers, as they are more moveable, can travel over any terrain, and do not need to worry about punchers, as they have tracks not tyres. They come with a bucket on the front, which you can have a 4 in 1 bucket, meaning the bucket opens and shuts, this is a very versatile bucket, as you can pick up items and materials with a grabbing action. You can also level with this 4 in 1 bucket.

An Excavator is a completely different machine, It, has a boom like an arm extension, which has the bucket attached to it, you can use this attach different buckets/hammers/argues/ripper attachments etc, like the bobcat you can hire these excavators in different sizes. They are mainly tracked, you can hire with wheeled if required.

What Are Excavators Used For?

The excavators are versatile machines, as they can sit in one position and swing around to operate, plus they move forward and back, they do not move as quick as a skid steer, as skid steers are more for levelling/picking up materials and loading, as any excavator can do all this also, but they are more useful when digging service trenches/dams/pools/pier holes/septic holes/soak well and leach drain holes etc, where a skid steer is unable to on its own.

There are times when a shovel might work, but if you are digging anything major, then earthmoving equipment is going to be in order.  Large projects might include digging a trench for a pool or digging a trench to lay the foundation of a building.  Anything like that is going to require Earthmoving equipment if you plan to stick to any type of reasonable time frame and come in various sizes such as mini excavators.

Why is the Bobcat brand so well known?

Bobcat (Skid steers) has been around for more than 60 years and accounts for over 35% of the entire market of skid steers.  In that time they developed a reputation for producing tough, reliable equipment that performs well, even in less than ideal conditions.  But now there are so many manufactures now that are just as competitive as Bobcat is.

Skid steer Bobcats, are sold now with John Deer, Hi tachi, Komatsu, Case, CAT, Volvo, etc,   At Dobson Excavations we purchase different brands of machine, as different brands can handle different types of job sites, so this is why our excavators and bobcats we have are in multiple sizes so we can use the equipment that’s best suited for the job.…

What is the best time of the year to excavate a pool?

If you are thinking of building your dream pool, you’ve probably thought about the best time to build it. While there is no wrong time to excavate a swimming pool, there are several factors that you need to consider when deciding the best time to plan and build your pool.

Each season has its advantages and disadvantages when it comes to pool construction. You need to weigh each option before making a final decision carefully. This article explores each option and concludes the best time of the year to excavate a pool.

Spring

Spring is one of the busiest months concerning pool construction. This is probably because most homeowners target the warm summer months to enjoy their pool.

On the downside, homeowners will not get to enjoy off-season sales. The reason for this is that suppliers and pool builders have great demand. Also, the high heat and humidity can delay the entire process.

Summer

An advantage of digging your pool during summer is that the ground is dry, making it easier for contractors to get the job done with ease. Like spring, summer is also a busy season for suppliers and pool builders as they complete projects that begin during the spring months.

If you still want to build during these months, consider scheduling the excavation process at the end of the season when it’s not that busy. However, this means that you will only get to enjoy your pool in the warm summer months.

Autumn

The most preferred time for excavating a pool is during Autumn, but before the rain starts. This is because months in the Autumn season have steady weather, making the pool installation process easy and less overwhelming. With the perfect temperature in fall, the contractors are capable of starting the project and completing it even quicker.

Furthermore, prices for pool excavation are cost-effective in Autumn months compared to those in summer or spring. Autumn months offer seasonal sales of the low cost of materials, shipping, transportation, and easier workdays. It is also easier to start and complete the project in the Autumn. The other benefit of excavating your swimming pool in the Autumn is that you will get to plant trees and vegetation for your backyard. You can plant and grow the plants before winter hits. This means that you will have a luxurious backyard by the time your pool is ready for use. Your swimming pool will probably be ready to use by summer when you start work in the fall or winter months.

Winter months

Besides fall, winter can also be a good time to excavate your pool. This is especially true if you have a low budget. Winter months also offer seasonal sales where prices of building materials are on the lower side. Besides, it is also a good time to negotiate the best deals with pool builders.

However, a downside of the winter months is the cold weather. It can be difficult and risky to dig a pool with frequent …

Top ways to improve a driveway with potholes

Whether your driveway is made of gravel, limestone, asphalt, or concrete, potholes are likely to be a nuisance. Since potholes will not fix themselves, you will need to find a way around them or risk damaging your car. Don’t wait a long time before setting this issue. The longer you wait, the worse the situation may become.

This is the job for wet hire companies, including a reputable one from Perth, Dobson Excavations. You can rest their equipment and staff to improve your driveway with potholes by doing the following:

The preparation phase

Since gravel and dirt potholes result from trapped water beneath the surface, you should work on improving the underground drainage quality to avoid future recurrence.

At Dobson Excavations we will rip the surface, scarify and roll the surface, if more product is required then they will lay more material over the areas.

Gravel and Limestone driveway pothole filling

All areas of where the potholes are would be ripped, the area scarifies with a bobcat, if gravel or limestone is required then this would be laid over the areas and a vibrating drum roller would complete the job to smooth out the area.

Asphalt and concrete driveway pothole filling

For potholes in Asphalt and concrete driveways, would be done completely different to Gravel or Limestone. With Asphalt you can use an asphalt filler, clean the area of all debris and dirt if the area in the pothole is dry soil you may want to dampen the area. Then fill in the potholes with either crushed limestone/rock or concrete to about 2 inches below the pothole, then fill with asphalt filler. Compact with small areas with a plate compactor, and then let the sun dry it, if rain is expected you will need to cover the area.

As for concrete, you will still need to remove any debris and dirt from the pothole. You will need a concrete mix to fill in the hole, you can buy ready made products where you just add water and mix. You fill the hole level with the concrete driveway, scrap off any excess concrete and allow to dry.…

Why is a sand pad required before constructing a shed or house?

You may be already used to seeing sand at the beach and may think that it has no important part in people’s lives. But did you know that the houses you live in and the streets you walk on are built using sand?

When talking about sand in building, it usually refers to the material that’s much firmer than the sand grains you’d find on the shoreline. It should also be clear of stone blocks and other contaminants.

Understanding the sand pad can be tricky for a first-time homeowner. Continue reading to learn everything there is to know about the sand pad.

Why is a sand pad required before constructing a shed or house?

You need the help of specialists, such as the Dobson Excavations in Perth, to make a proper sand pad. We work with reliable sand suppliers and certify the sand pad before putting up any structure. This is important since it will lay the foundation or groundwork for the project. You need something solid and durable for this purpose.

Different types of sand for sand Pad

Numerous varieties of sand can be utilised in construction, each for a distinct purpose. Therefore, it’s critical to understand that not all sand is the same.

Clean Fill Sand

Sand for House pads has to be certified to build the house on and must be free of any debris, Fill sand is straight of the face, which means it is Natural with small granules, and just the right amount of clay for compaction for sand pads for houses, sheds, water tanks etc.

Plaster sand

Also known as rendering sand used for exterior wall rendering, once combined with the ratio of water and cement has great adhering characteristics, it can also be used to set paving.

Brickies sand

This sand has a content of clay and fines for a more workable sand, it is used in mortar for brick laying and also can be used in Limestone Block construction.

Paving sand

Used in shaping, screeding and sculpting, compromise between both Plaster and Brickie sand. Has strong compaction and setting strength, without even using little or no cement or bonding products.

Compacting the sand pad

In a construction project, sand compaction involves using mechanical force to densify a soil by minimising the space between sand grains. The key objective of the procedure is to create a solid working foundation, so experts must complete it with the appropriate skills and equipment.

Soil compaction equipment comes in a variety of styles and combinations, such as the number of drums and vibratory system. All types result in increased soil density, which boosts the supporting power of the soil.

These machines have rubber tyres that are separated and have varying air pressure. They usually have ballast mechanisms that adjust weight as needed to achieve compaction requirements.

Compactor

Used to compact sand pads, it has a metal compactor plate, which in combination with the vibration of the plate compacts the sand. Used on each layer of sand to …